boltarr

Boltarr
A self-hosted network dashboard for mapping, monitoring, and analyzing your local network. Scan subnets on a schedule, track what changes between scans, detect when hosts go offline, visualize topology, manage VLANs, monitor service uptime, and chat with an AI assistant that knows your network.
📖 New here? See the Usage guide for how to operate Boltarr day-to-day, or the wiki for every feature in detail.
Features
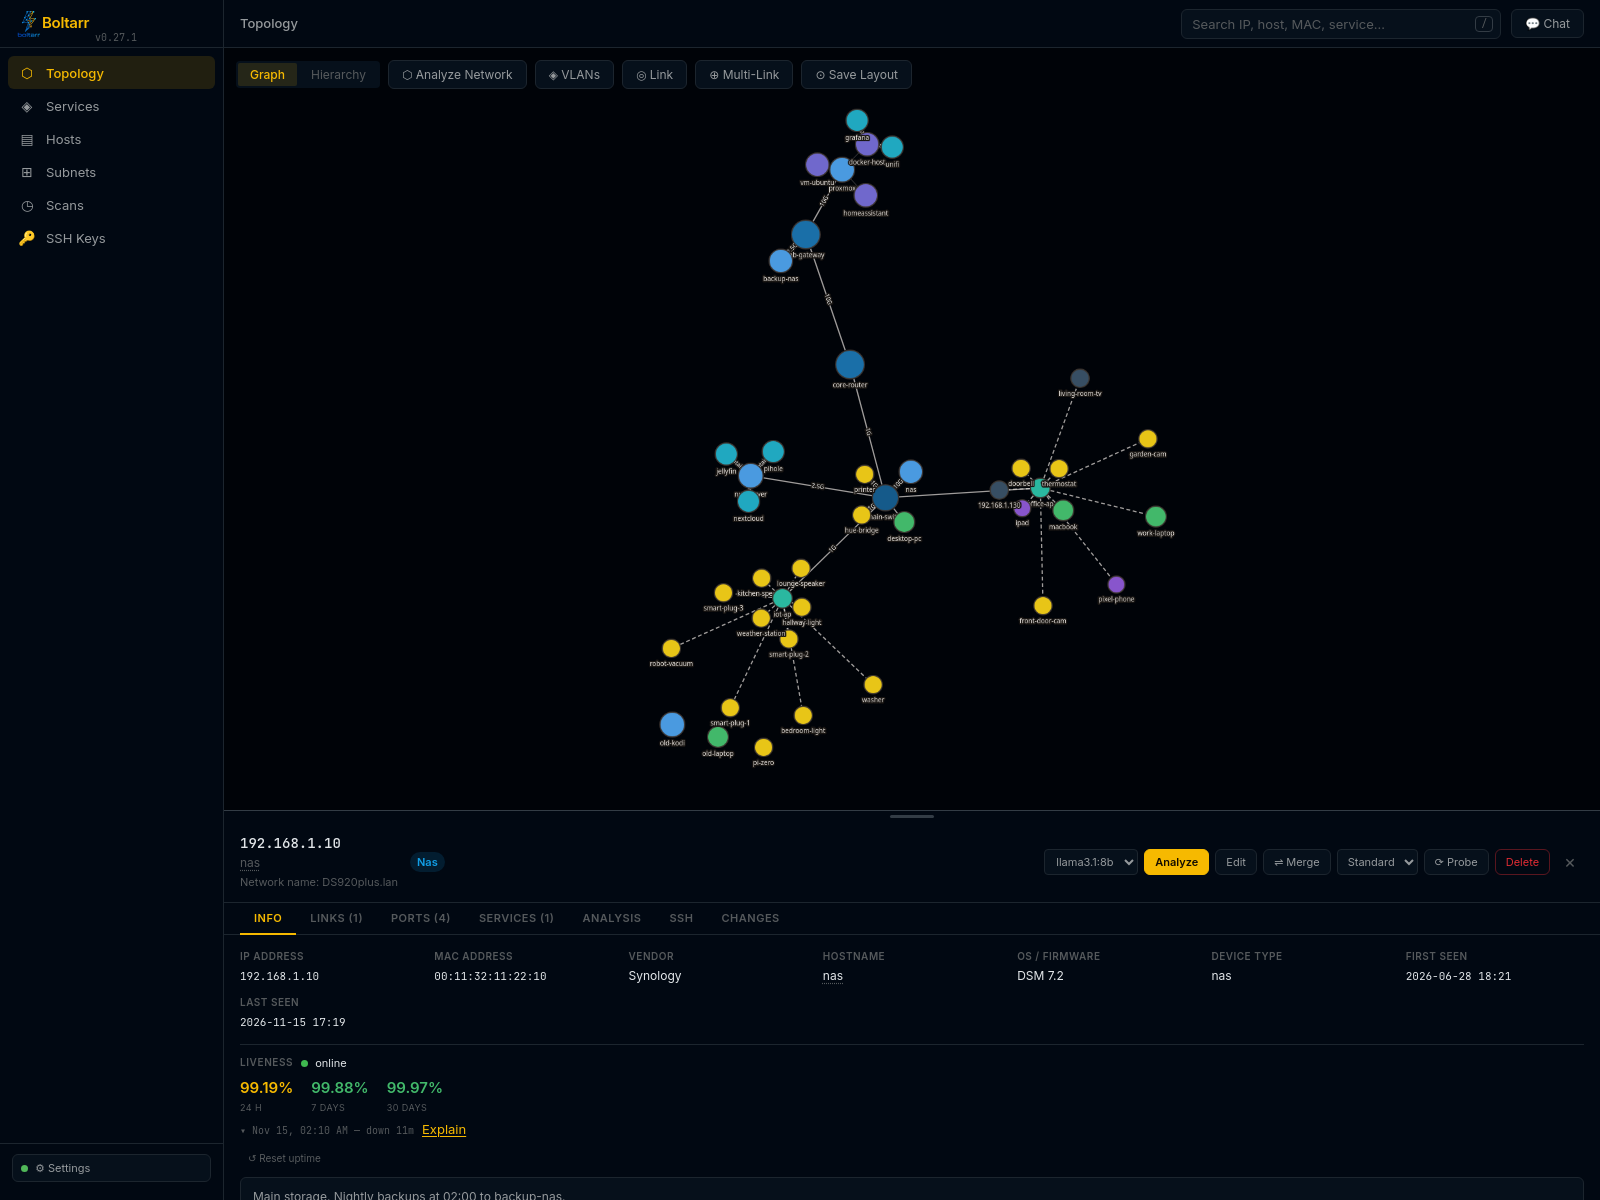
Map your network
- Network scanning — nmap-powered host and port discovery with a visual scan builder and reusable scan profiles (Quick/Standard/Full + custom). Scans wait in a queue instead of overlapping, have a per-host time limit, and show nmap’s own error when one fails
- Scheduled scans — on an interval (optionally clock-anchored) or on chosen weekdays, with an optional active-hours window; target all subnets or one, the whole range or just static/dynamic hosts. 🔕 Silent schedules record changes without sending alerts
- Subnets page — one row per subnet with its DHCP pool use, hosts online, last scan, and Scan/Stop on the row
- DHCP-aware classification — a per-subnet DHCP range classifies hosts as static or dynamic, and DHCP warnings flag a static host inside the pool, an important device on a pool address, or a nearly full pool
- IP History — every static-range IP as in use, recent, stale, gone or never seen, so you know which addresses are free
- Topology view — interactive Cytoscape.js graph with drag-and-drop layout, VLAN coloring, connection types (wired/wifi/fiber/DAC/virtual), plus a tiered Hierarchy view
- Device management — add/edit/delete hosts, merge multi-homed devices, annotate with notes. Names you set are never overwritten by a scan (the name the network reports is kept separately)
- Global search and export — find any host or service by IP, MAC, name, vendor, notes, port or URL (
/orCtrl+K); export Hosts, Services or IP History as CSV or JSON - VLAN management — define VLANs, assign them to connections, visualize on topology
- SSH key registry — which keys belong on which hosts and users, with a safe copy-paste deploy command
Watch it
- Change tracking — records what each scan finds different (new hosts, opened/closed ports, MAC/hostname changes), with a retention window
- Change alerts — ntfy notifications as a per-scan summary and/or a daily digest; scope by host classification (static / dynamic / all) with per-host opt-outs
- Host liveness & uptime — a light background ping tier marks hosts online/offline, tracks uptime %/outages, alerts on transitions, and links service outages to a down host (one alert instead of a flood)
- Services registry — track running services per host, with a services topology and dependencies
- Service uptime monitor — HTTP(S), TCP or Ping (ICMP) checks with an overridable target, every 15–600 s; 5xx replies count as down, with an optional Accepted replies list per service. Pause with a reason and an end time (shown as Maintenance). Alerts have a grace period and quiet hours; failed notifications are retried and shown in Settings
- Public status page — push a sanitized status summary (services, hosts, and networking gear) to a separate, internet-facing page over your LAN — public names only, never internal IPs. Includes an admin panel: public/private section gating, uptime windows (1h/24h/7d/30d), branding, announcements, a maintenance calendar, automated-maintenance windows, an incident timeline, and a “may be out of date” banner when updates stop
- Timezone-aware — your timezone drives schedule times, quiet hours, the digest, and every time shown
- View levels — Basic / Intermediate / Advanced: show as little or as much as you like. Things you use always show, and search finds anything your level hides
AI (optional)
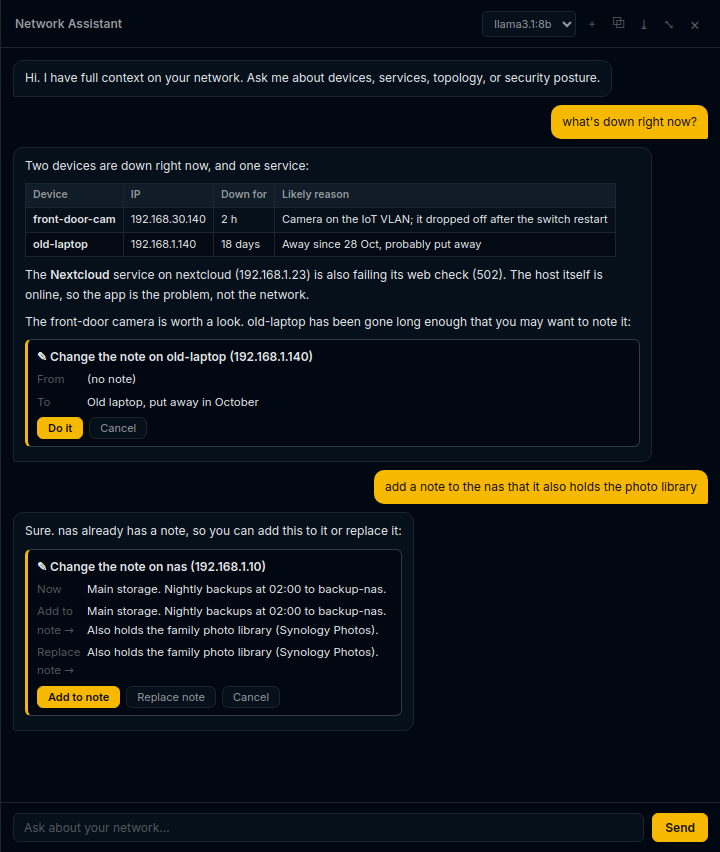
- AI chat that knows your live network — status, uptime, recent changes and outages. The most important devices are sent in full and every other one in a short line; devices you mention get full detail. Streaming, formatted replies, Stop, wide view, New chat
- AI cards — the chat can suggest actions (open a host or service, explain an outage, set a note/name/type, scan, probe, pause/resume monitoring). Boltarr checks each one and nothing happens until you click Do it. Nothing destructive is possible
- Analyze a host or the whole network; Explain any outage from the facts Boltarr gathers; an optional AI summary in the daily digest
- AI history — earlier results and a record of every AI action, with keep/delete rules
- Fits your model — for Ollama, a Context setting; Boltarr trims its notes to fit and shows the model’s maximum context and whether it runs fully on the GPU
- Providers — Ollama, OpenAI-compatible APIs, and Anthropic. Everything else works without AI
Security & data
- Optional login — one admin password (or trust a login service like Authelia/Authentik); new installs are asked to set one, upgrades can turn it on in Settings
- Self-contained & locked down — no outside scripts or fonts (works fully offline); strict browser security rules; forged requests from other sites are blocked; saved keys and tokens are never sent to a new address on their own
- Backup & restore — one-click backup, optionally password-protected (AES-encrypted zip); restore shows what’s inside first and applies it without a restart
📖 Full documentation: Boltarr wiki
Quick start (Docker)
[!NOTE] Deployment is now a single file.
docker-compose.ymluses host networking by default so scanning works out of the box, with commented one-line toggles for unprivileged LXC (AppArmor) and bridge-only. If you previously useddocker-compose.host.ymlordocker-compose.lxc.yml, switch todocker-compose.yml— see the table below.
curl -O https://raw.githubusercontent.com/brq-ae/boltarr/master/docker-compose.yml
docker compose up -d
Open http://<host-ip>:12100 — with host networking Boltarr binds :12100
directly on the host (no port mapping). On a new install Boltarr first asks you to
create an admin login (you can skip it and set one later in Settings → Login & Security).
Images are also tagged with their version (e.g. brqae/boltarr:0.27.0) if you want
to stay on one version or go back to an earlier one.
Why host networking? Boltarr scans your LAN with nmap (host discovery, MAC addresses, the liveness ping tier). Docker’s default bridge network sandboxes the container, so nmap can’t reach your LAN — you’d get no host discovery, no MAC addresses, and degraded liveness. So host networking is the default; bridge is a commented toggle for the “I only track things manually” case.
Pick your setup (all in the one docker-compose.yml):
| Your environment | Want LAN scanning? | What to do |
|---|---|---|
| Normal Docker host | Yes (recommended) | Use it as-is |
| Unprivileged LXC (Proxmox) | Yes | Uncomment the security_opt: apparmor=unconfined toggle |
| Anywhere | No (manual only) | Switch to the commented bridge toggle |
Tip: run Boltarr on its own box, separate from any internet-facing service (e.g. the public status page) — it holds your network map and SSH keys.
Prefer to clone the full repo?
git clone … && cd boltarr && docker compose up -d.
With bundled Ollama (local AI)
docker compose -f docker-compose.ollama.yml up -d

# Pull a model after startup
docker exec boltarr-ollama-1 ollama pull llama3.2
The bundle already points Boltarr at http://ollama:11434 with llama3.2. If you pull a
different model, pick it in ⚙ Settings → AI → Default Model.
AI configuration
AI is optional. Configure it in ⚙ Settings → AI (the ⚙ Settings button is at the bottom of the sidebar), or via environment variables. ⚡ Test AI checks the connection. See the wiki’s AI Assistant page for everything the AI can do.
Supported providers
| Provider | Notes |
|---|---|
| Ollama | Local/self-hosted. Set Base URL to your Ollama instance (e.g. http://192.168.1.50:11434) |
| OpenAI-compatible | OpenAI, LM Studio, Groq, Together AI, Mistral, LocalAI, etc. Set Base URL + API key |
| Anthropic | Claude API. Set API key only |
Environment variable configuration (Docker)
# in docker-compose.yml environment section:
LLM_PROVIDER: ollama          # none | ollama | openai | anthropic
LLM_BASE_URL: http://192.168.1.50:11434
LLM_MODEL: llama3.1:8b
LLM_API_KEY: ""               # only for openai / anthropic
LLM_TIMEOUT: 120
LLM_LONG_TIMEOUT: 600
LLM_NUM_CTX: 8192             # Ollama only: context window in tokens (0 = Ollama's default)
Env vars override the UI settings when set.
Context size (Ollama)
Ollama’s own context window is small by default, which can cut off the network notes the chat sends. Settings → AI → Context (tokens) (default 8192) sets it. Boltarr keeps about a quarter of the window for the answer and trims its notes to fit; if the AI still runs out of room it says so. Under the box, Settings shows the model’s maximum context and whether it is loaded fully on the GPU.
AI chat behind a reverse proxy
If you access Boltarr through a reverse proxy (Nginx Proxy Manager, Caddy, Traefik, etc.) and see errors in the AI chat — especially with larger models — the proxy is likely timing out before the model responds. Increase the proxy’s read timeout to at least 120–300 seconds (for the whole Boltarr site, or at least for /api/chat/stream and the Analyze requests).
Nginx Proxy Manager: add proxy_read_timeout 300; and proxy_send_timeout 300; as custom Nginx config for the proxy host.
Caddy: add timeouts { read 5m } to the reverse_proxy block.
Config file
Copy data/config.yaml.example to data/config.yaml and edit:
llm:
  provider: openai
  base_url: https://api.openai.com/v1
  api_key: sk-...
  model: gpt-4o
Proxmox / LXC
Running Docker inside an unprivileged LXC? Use the standard docker-compose.yml
and uncomment the AppArmor toggle in it:
security_opt:
  - apparmor=unconfined
Without it you’ll hit docker-default profile could not be loaded — unprivileged
LXC containers can’t load AppArmor profiles into the host kernel. Uncommenting it
is safe: Proxmox applies its own AppArmor profile to the entire LXC, and
user-namespace mapping ensures root inside the container has no privileges on the
Proxmox host. (Keep network_mode: host for LAN scanning.)
LXC pre-requisites (Proxmox UI → your LXC → Options)
- Enable Nesting (
nesting=1) - Enable keyctl (
keyctl=1)
Note: Ubuntu LXC templates often ship without curl. If the Docker install script fails immediately, run apt install -y curl first.
Unraid
Install via Community Applications (search boltarr) once the template is listed, or add it manually:
- In Unraid, go to Docker → Add Container → Template URL
- Paste:
https://raw.githubusercontent.com/brq-ae/boltarr/master/templates/unraid.xml - Set your data path (default:
/mnt/user/appdata/boltarr) and optionally fill in AI settings - Click Apply
The template sets Network Type: Host (and adds --cap-add=NET_RAW --cap-add=NET_ADMIN) so nmap can scan your LAN — leave that as-is. Data persists in the mapped appdata folder. AI is optional — configure it from the ⚙ AI Settings button in the app.
Manual install (without Docker)
Requires Python 3.11+ and nmap.
# Install nmap
sudo apt install nmap       # Debian/Ubuntu
brew install nmap           # macOS

# Run
bash run.sh
App starts at http://localhost:12100
Data
All data is stored in data/:
boltarr.db— SQLite database (hosts, ports, connections, VLANs, scan history)config.yaml— all settings, including your AI key, ntfy and status page tokens and the login (written by the UI, or copy fromconfig.yaml.example)
Mount ./data as a Docker volume to persist data across container restarts (done automatically in the provided compose files).
Backup & restore live in Settings → Data. Backups contain your tokens and keys — keep the password-protected option on. A restore shows what’s in the backup before it replaces anything, needs no restart, and is refused while a scan is running. See Backup and Restore.
Forgot the login password? Turn login off from the host, then set a new one in Settings:
docker exec boltarr reset-password
Use your container’s name if it isn’t boltarr (on Unraid: Docker tab → Boltarr icon → Console → reset-password). Without Docker, run venv/bin/python -m backend.reset_password from the Boltarr folder.
More on login, a login service in front (Authelia/Authentik) and browser security: Login and Security.
Scripts and the API
Every change through the API (POST/PUT/PATCH/DELETE on /api/…) must send the
header X-Boltarr: 1 — with login on and off (since v0.26.2). This blocks forged
requests from other websites. The Boltarr page always sends it.
curl -X POST -H "X-Boltarr: 1" http://<host-ip>:12100/api/…
Browser security
Boltarr tells your browser to refuse any code written into its pages (strict mode), so code slipped into a hostname or note can’t run. Settings → Login & Security → Strict mode lists anything the browser blocked. If a button stops working after an update, set BOLTARR_ALLOW_INLINE_SCRIPTS=1 in the container’s environment to switch strict mode off, restart, and please open an issue.
Updating
docker compose pull
docker compose up -d
Boltarr upgrades its database by itself on start — take a backup first. After updating, refresh the page once with Ctrl+Shift+R (Cmd+Shift+R on Mac). If you use the public status page, update its image too.
Manual install: git pull, then bash run.sh (it installs any new packages on start).
License
Apache 2.0
This project was built with the assistance of AI tools.